DELL G15 5511 筆記型電腦 - 清潔和更換 散熱膏
Quick links for the tools you need:
KOLD-01 Thermal Paste (includes KOLD-01 Thermal Paste x 1, Gloves x 1 pair, KLEAN-01 Thermal Paste Cleaning Wipe x2, Spreader x 1, Spatula x 1, Instruction x 1 )
KLEAN-01 Thermal Paste Cleaning Wipe (includes KLEAN-01 Thermal Paste Cleaning Wipe x 20, Gloves x 1 pair, Spreader x 1, Spatula x 1)
KOMBO-01 螺絲起子套裝 (包括精密螺絲起子頭X100,螺絲起子手柄X1,延長軸X1,柔性延長軸X1,鑷子X1,1/4至4毫米驅動器適配器X1,塑料撬動工具X3,SIM卡拆卸工具X1,吸盤X1,開孔器X8,磁化器/消磁器X1,防靜電刷子X1,磁性螺絲墊X1)
如果您嘗試更改 散熱膏 在您的戴爾 G15 5511 筆記型電腦上,但您沒有清潔和更換經驗 散熱膏 在筆記型電腦上,尋求專業幫助總是一個好主意。以下是您在嘗試更改 散熱膏.
But first, let’s talk a bit about what you could get after you’ve successfully done the procedure.
What will I get after changing the thermal paste?
為了更清楚起見,我們在使用新款 2 台 G15 5511 筆記型電腦之前和之後對一台使用了 2 年的 DELL G15 5511 筆記型電腦進行了壓力測試 散熱膏.對於這個測試,我們使用了我們自己的 Kooling Monster KOLD-01 散熱膏.
在塗抹新漿料之前, CPU 在壓力測試期間達到了高達87攝氏度的溫度。在施加新糊狀物后,在壓力測試期間,溫度降低到涼爽得多的 79 攝氏度。
僅通過應用新的,就可以改善大約8度 散熱膏!
What to prepare before you replace thermal paste?
Before getting started with the process, you need to have all the essentials by your side.
First and foremost, you need to have the new thermal paste with you. Make sure to pick a high-quality one for optimum results.
You also need some equipment to clean up the old paste. We recommend getting a dedicated cleaning solution, like Kooling Monster KLEAN-01. Plus, if you opt in to get Kooling Monster KOLD-01 thermal paste, you get cleaning wipes free of cost in the package.
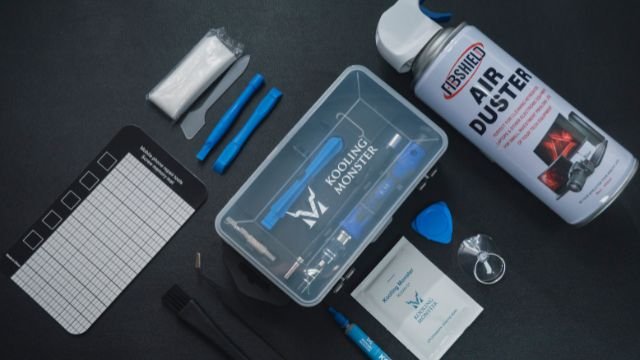
此外,還需要準備用來拆解電腦的螺絲起子組以及用來整理收納不同螺絲的磁性螺絲墊。
準備一些清潔工具,包括小刷子、皮吹或壓縮空氣,來清潔風扇和其他組件。
Kooling Monster KOMBO-01包裝內含上述所有拆機與清潔小工具。
塗抹散熱膏時需要使用刮刀來將其塗抹均勻,KOLD-01 散熱膏包裝內即含有刮刀。
Lastly, we recommend wearing a pair of protective gloves while doing all this. If you get our KOLD-01 thermal paste or KLEAN-01 cleaning kit, protective gloves come free of cost in the package, so you don’t have to worry about that.
如何拆卸 DELL G15 5511 筆記型電腦並更換 散熱膏?
第 1 步:準備工作
收集工具:組裝必要的工具,包括 散熱膏、清潔濕巾、 螺絲起子、撬具、防靜電設備。
安全注意事項:洗手或戴上手套和防靜電腕帶,以防止靜電損壞。
放置筆記型電腦:將筆記型電腦背面朝上進行拆卸。
第 2 步:打開筆記型電腦
卸下螺絲:使用 PH0 螺絲起子 從頂部和底部取出四顆螺絲,鬆開中間的四顆螺絲。
整理螺釘:將螺釘放在磁墊上進行整理。
撬開蓋子:如果卡住,請使用撬工具輕輕打開底蓋。
第3步:放電和取出電池
斷開電源線:使用撬桿從主機板上拔下電源線。
放電:按住電源按鈕 15 秒鐘。
取出電池:擰下四顆螺絲,將電池從機箱中釋放出來。
第 4 步:元件移除
固態硬碟:從 SSD 上擰下並卸下兩顆螺絲,然後小心地將其滑出。
Wi-Fi 卡:取出單顆螺絲並取出Wi-Fi 卡。
頂蓋和主機板檢修:擰下主機板上的兩個和頂部的兩個,以抬起頂蓋。
拆下無線網卡電纜:取下膠帶並放在一邊,不要從主機板上拆下。
斷開風扇和音訊電源線:使用兩根撬桿拆下兩側的風扇電源線和右側的音訊線。
第 5 步:色帶和顯示電纜分離
絲帶:使用撬棒和鑷子拆下並拉出四條精緻的絲帶。
顯示電纜:拔下位於頂部的顯示電纜。
第6步:主機板拆卸
擰下主機板:卸下將主機板固定到機箱的 11 顆螺絲。
檢查剩餘附件:在拆卸之前,確保沒有電纜或螺釘連接。
抬起主機板:小心地取出主機板並將其放在一邊。
第 7 步:散熱器和風扇維護
擰下散熱器:以對角線方式從散熱器上卸下六顆螺絲。
乾淨 散熱膏:使用清潔濕巾清潔舊 散熱膏 從 CPU/GPU 和散熱器。
風扇螺絲:使用PH型000 螺絲起子 從風扇外殼上擰下八顆螺釘。
清潔風扇:打開風扇,使用防靜電刷或壓縮空氣進行清潔。
第 8 步:應用新 散熱膏
散熱膏 應用:塗抹少量 散熱膏 均勻地在 CPU 和 GPU。
傳播 散熱膏:使用刮刀或圓點法均勻分佈。
第 9 步:重新組裝
更換散熱器和主機板:按照相反的拆卸順序進行操作,確保正確放置。
重新連接電纜:連接螢幕電纜並將固定夾翻轉回原位。
擰緊主機板螺絲:固定主機板上的 11 顆螺絲。
重新安裝元件:將Wi-Fi卡和SSD重新插入各自的插槽。
更換電池:將電池放回原處並用螺絲固定。
最終蓋板:重新裝上頂蓋和底蓋並擰緊所有螺絲。
遵循這些步驟應確保使用新鮮的筆記型電腦進行安全徹底的重新組裝 散熱膏 應用的。
The general rule of thumb is to keep an eye on your thermals. As soon as you notice that your thermals are going higher than they should, it’s likely that your thermal paste needs changing — and you should replace it at that point.
How long does it take for thermal paste to work?
Good quality thermal pastes don’t need any time to start working. For example, if you use KOLD-01, it starts giving you the best possible performance as soon as you assemble your laptop and start using it.
However, some pastes do have a “curing time”, which means that paste requires a certain period of time before it starts giving its best performance. The curing time is usually mentioned on the product page. (Learn more about How Long Does It Take for Thermal Paste to Work?)
底線
Let us know which laptops to demo this process with next!
Even though replacing the thermal paste may sound like a hefty job, it’s pretty easy if you follow the right instructions. To begin with, make sure you have the right equipment by your side.
Disassemble your laptop, clean up the fans, remove the old paste, apply the new one, then put everything back together.


